

ECLOUD / 08
Upload Odoo modules and publish to production
Prepare code, validate in Testing and publish with a backup and functional checks.
- Prepare the repository
- Validate in Testing
- Publish and verify
Arrows point to real controls. Enlarge any detail. Names and options may vary by version and account permissions.
01 · Prepare the change
A module adds or changes Odoo features. Production serves real users; Testing lets you check changes before publishing. This procedure is for the authorised application owner, supported by the developer.
- Obtain modules compatible with your Odoo version, dependencies and a functional test list.
- Check existing modules: a new version must not omit components the business needs.
- Agree who validates, when to publish and who handles failures.
02 · Organise and upload files
- In the approved repository, place each module under
addons/technical_name/, containing its__manifest__.pyand developer-provided code. - If extra Python libraries are required, obtain the appropriate root-level
requirements.txt. - Review and push changes with Git. Follow the Git over SSH guide if needed.
- In GitHub, verify the branch, files and commit identifier. Record the identifier to connect the code with the deployed version.
Do not upload databases, customer files, passwords, VPN profiles or private keys to the repository.
- addons/
- mi_modulo/
- addons/mi_modulo/
- __manifest__.py · __init__.py · models/ · views/
- requirements.txt
- At the root, only for additional dependencies.
git status
git diff
git add addons/
git diff --cached --stat
git diff --cached --check
git commit -m "Update approved modules"
git push origin main
git rev-parse HEAD
Run from the repository folder. Replace main with the agreed branch when necessary. The final command shows the commit to verify in GitHub and in the build. If requirements.txt changed, stage it explicitly after review.
03 · Select or create Testing
- Open the Odoo application in AppCloud and select Versiones y módulos (Versions and modules).
- If Testing exists, select it and check its name in the heading.
- Otherwise, use Crear entorno de pruebas (Create testing environment): complete the name, email and password, and confirm resources and costs before creation.
- Wait for completion. Open the environment and check access, using VPN if private.
- If testing needs copied data, coordinate a restore from Backups with the owner and protect personal information.
Creating Testing does not mean it already contains a Production copy.
Crear pruebas

01Check capacity and conditions. After creation, confirm Pruebas in the card and heading before building modules.
Límite de contenedores

01This is not a password error. Review resources and plan with your administrator; do not delete production to free capacity.
04 · Build and test modules
- Confirm the selected environment is Testing.
- Under Construir y validar módulos, enter the HTTPS repository URL, branch and comma-separated technical module names.
- For private repositories, use Token Git with an authorised, repository-scoped token with content read permission and an expiry. Do not paste an SSH key.
- Select Construir y probar (Build and test) and monitor progress. If it fails, review the first relevant error with the developer.
- Record the generated version and validated commit. Do not change the branch during validation.
Your computer’s SSH access and the console’s HTTPS access are separate. Automated tests only run tests supplied by the developer; a successful build does not replace business validation.
- Repositorio
- https://github.com/empresa-demo/odoo-addons.git
- Rama
- main
- Módulos
- mi_modulo,otro_modulo
- Token Git
- Private repositories only; read-only secret with expiry.
Fictional example. Replace names and URL; select Build and test only in Testing.
Construir y validar módulos

01Check addons/<module>/__manifest__.py and dependencies. Included tests are run; without automated tests, check functions manually.
Repositorio
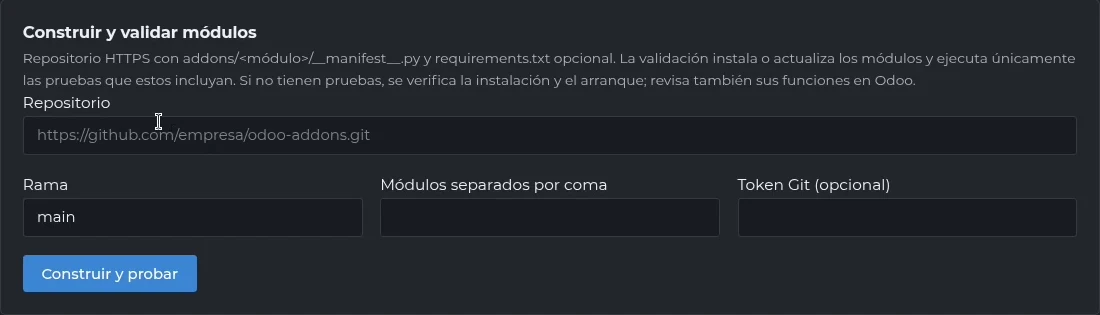
01Use HTTPS without credentials in the URL. Set the approved branch and comma-separated technical names. Use Token Git only if required, with minimum read permissions and expiry.
Construir y probar

01Confirm Pruebas in the heading. Wait for final status and record the version and commit before validating functions.
05 · Validate business functions
- Open Odoo in Testing and verify the environment before entering data.
- Locate the module and check installation or update. If absent, ask the administrator about application filters and the module list.
- Using approved data, test regular-user access, record creation, editing, permissions and the new feature.
- Also check existing functions that could be affected and attachments.
- Record results and approval. Resolve errors and validate again before proceeding.
06 · Publish with backup and authorisation
- Agree a maintenance window and notify Odoo users.
- Verify a recoverable database and attachment backup, its date and the recovery plan. Record the current version.
- From the validated Testing version, use the console’s publish-to-production action. Read the destination and confirmation before accepting.
- Monitor Publicación en producción and its logs: the observed flow prepares a backup, updates modules and checks the service. It may temporarily pause services.
- Wait for the final state; do not repeat publication merely because it takes time.
- 01Recoverable backup
- 02Tested and approved version
- 03Publish to production
- 04Check features and logs
Publicar en producción

01The action appears beside the version. Check identifier and modules: they must match the approved version.
Aceptar
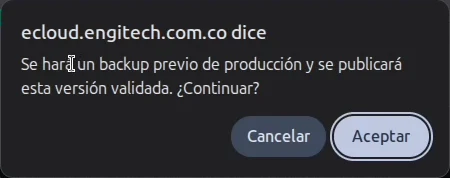
01Starts publication. If approval, a recoverable backup or a maintenance window is missing, use Cancelar. The automatic backup does not replace the recovery plan.
Publicación en curso

01The flow reports backup, module update and service verification. A pause may occur; wait for the result before repeating.
07 · Verify and close the change
- Open the Production link with an authorised user.
- Check the new feature, permissions, critical functions and attachments; compare with Testing results.
- Review deployment status, version and logs. Record time, version and owner approval.
- If it fails, communicate the impact and contact support using reviewed information, without tokens or passwords.
Do not restore on your own: a restore may replace transactions recorded after the backup. The owner must decide how to recover code and data consistently.
Help and references
Available options depend on the service, version and your account permissions.
Request support ↗